

Technical Warning: Why pre-Installation testing of displays matters
When replacing smartphone displays—especially LCDs without frames—precision and attention to detail are everything. These parts are delicate, and even small mistakes during installation can lead to immediate damage. Luckily, many of these issues are avoidable with one simple step: testing the display before you install it.
Pre-installation testing is essential not just for quality assurance, but also to protect yourself when it comes to warranty claims. If a screen shows signs of installation but turns out to be defective, it's often impossible to tell whether the damage occurred during installation or if it was already faulty upon arrival. In these cases, RMA requests are usually denied.
By taking a few extra minutes to test the display first, you can avoid disputes, confirm the part is working as expected, and ensure you're covered if the display is defect on arrival (DOA). It's a small effort that can save you a lot of trouble—and help prevent unnecessary costs due to denied RMAs.
In this blog, we’ll explain why testing is so important, how to do it properly, and what to watch out for. Let’s get started.
⚠️ Why Pre-Installation Testing?
Note: LCD without frame = vulnerable component
Before you start fitting a display into a device, always test it first. Doing so ensures that:
- You can avoid installing a faulty display, as a defect is not always visible from the outside. Think of pressure damage of the OLED panel during transport.
- You preserve your right to return or replace under warranty.
- You reduce risk of damaging the component during handling.
💡 Most display-related RMA claims could have been prevented with a simple test procedure.
🧪 Test Instructions – LCD Without Frame
Here’s what you need to keep in mind when testing:
- ✅ Leave the protective film and labels on during the test.
- ✅ Always use ESD protection (anti-static wristband/mat) to prevent static damage.
- ❌ Never bend the flex cable more than 90° – overbending can cause black screens or display artifacts (e.g. vertical lines).
🔌 Step-by-Step: Pre-Installation Test Procedure
- Connect the new LCD's flex cable to the motherboard connector of a compatible test device.
- Power on the device and check:
- Display output (brightness, color, pixel accuracy)
- Touch responsiveness
- Presence of any dead zones or flickering
- ✅ If all tests pass – proceed with the full installation.
- ❌ If any issues are present – do not install. Instead, log the issue via the RMA tool.
🛑 Important Notice
While we currently do not reject all warranty claims for installed, untested displays, this may change in the future.
In clear and obvious cases where it's evident that a defective display was installed without prior testing, the warranty can be declined.
To avoid complications:
- Stick to the test procedure.
- Don’t rush the install.
- Protect your work (and your warranty).
In conclusion, pre-testing displays is an essential step that should never be skipped. It protects both the technician and the component, and guarantees that everything is functioning correctly before you proceed with installation. By following the correct handling procedures and respecting the limitations of the flex cables, you significantly reduce the risk of defects and avoid unnecessary warranty claims.
❗ 👂 Our advice: always test first, then install. Especially since damage is not always visually detectable - think, for example, of a break in the OLED panel while the glass still appears to be intact.
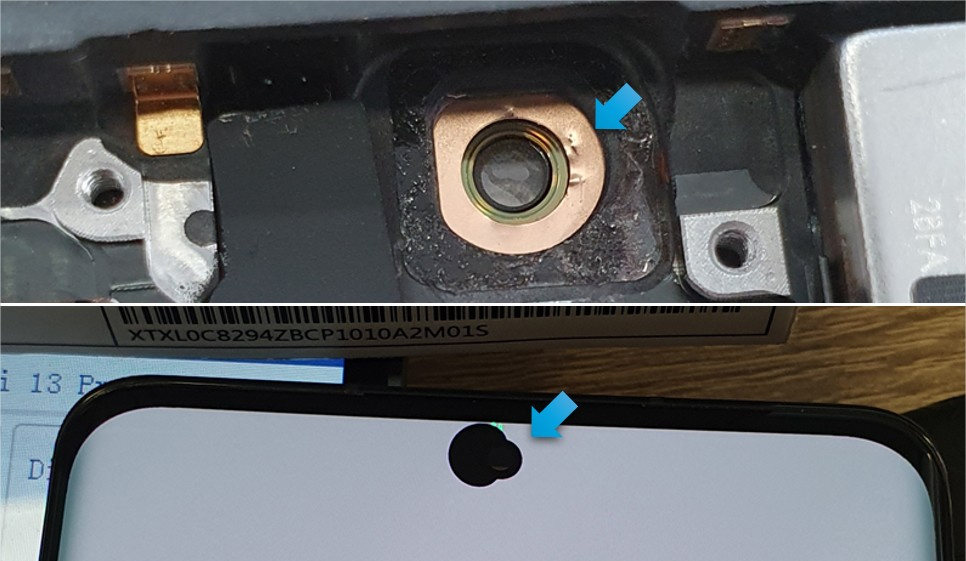
Examples
Here are some examples of displays that were damaged during installation. Damage to the back of the display can cause visible lines or spots on the screen. These RMAs will be rejected because the damage happened during installation. Sometimes, the display may look fine before installing, so the RMA might be accepted at first. That’s why it's important to test the display before installation to make sure you can get a replacement for any DOA (dead on arrival) units.


Related articles
-

JK vs Moshi In-Cell Displays
Compare JK and Moshi iPhone In-Cell LCD screens to discover which is best for your repair needs based on resolution, color accuracy, touch sensitivity, and power consumption.
Read more -

Why professional testing for compatible iPhone batteries matters — and why you should demand it!
Learn how Mobileparts.shop ensures top-quality iPhone batteries through rigorous testing done by suppliers, safeguarding your repairs and customer safety.
Read more -

New: Pulled iPhone 16/17 front cameras – directly calibratable without an additional flex
Discover the new iPhone 16/17 front cameras that are pre-tested for calibration, making repairs faster and simpler for technicians.
Read more